tongquocthai99 gửi vào
- 33131 lượt xem
Chúng ta đã từng điều khiển động cơ trong các dự án xe điều khiển bằng combo thần thánh Arduino + Blutooth HC05  . Hôm nay chúng ta sẽ cùng tìm hiểu xem liệu ESP8266 có thể thay thế cho combo huyền thoại này không nhé
Chuẩn bị
Mạch esp8266
1 mạch cầu H
2 động cơ
Lập trình cho Esp8266
Trước khi làm bước này thì các bạn nên tham khảo qua bài viết
Sau khi đã đọc xong bài viết trên thì chúng ta bắt đầu nào
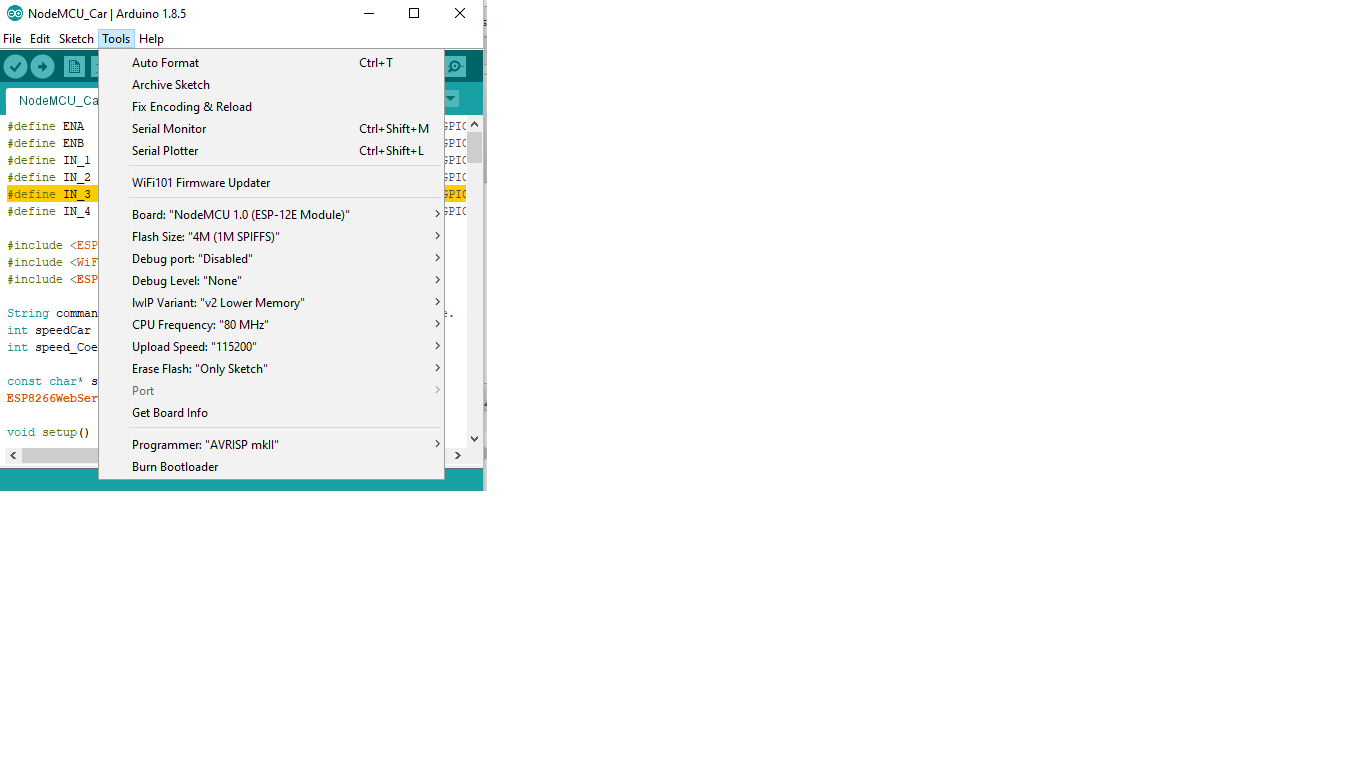
Sau khi điều chỉnh IDE giống như trong hình các bạn chỉ cần copy đoạn code này và nạp cho Esp thôi.
#define ENA   14          // Enable/speed motors Right        GPIO14(D5)
#define ENB   12          // Enable/speed motors Left         GPIO12(D6)
#define IN_1  15          // L298N in1 motors Right           GPIO15(D8)
#define IN_2  13          // L298N in2 motors Right           GPIO13(D7)
#define IN_3  2           // L298N in3 motors Left            GPIO2(D4)
#define IN_4  0           // L298N in4 motors Left            GPIO0(D3)

#include <ESP8266WiFi.h>
#include <WiFiClient.h>
#include <ESP8266WebServer.h>

String command;             //String to store app command state.
int speedCar = 800;         // 400 - 1023.
int speed_Coeff = 3;

const char* ssid = "NodeMCU Car";
ESP8266WebServer server(80);

void setup() {

 pinMode(ENA, OUTPUT);
 pinMode(ENB, OUTPUT);
 pinMode(IN_1, OUTPUT);
 pinMode(IN_2, OUTPUT);
 pinMode(IN_3, OUTPUT);
 pinMode(IN_4, OUTPUT);

  Serial.begin(115200);

// Connecting WiFi

  WiFi.mode(WIFI_AP);
  WiFi.softAP(ssid);

  IPAddress myIP = WiFi.softAPIP();
  Serial.print("AP IP address: ");
  Serial.println(myIP);

 // Starting WEB-server
     server.on ( "/", HTTP_handleRoot );
     server.onNotFound ( HTTP_handleRoot );
     server.begin();
}

void goAhead(){

      digitalWrite(IN_1, LOW);
      digitalWrite(IN_2, HIGH);
      analogWrite(ENA, speedCar);

      digitalWrite(IN_3, LOW);
      digitalWrite(IN_4, HIGH);
      analogWrite(ENB, speedCar);
  }

void goBack(){

      digitalWrite(IN_1, HIGH);
      digitalWrite(IN_2, LOW);
      analogWrite(ENA, speedCar);

      digitalWrite(IN_3, HIGH);
      digitalWrite(IN_4, LOW);
      analogWrite(ENB, speedCar);
  }

void goRight(){

      digitalWrite(IN_1, HIGH);
      digitalWrite(IN_2, LOW);
      analogWrite(ENA, speedCar);

      digitalWrite(IN_3, LOW);
      digitalWrite(IN_4, HIGH);
      analogWrite(ENB, speedCar);
  }

void goLeft(){

      digitalWrite(IN_1, LOW);
      digitalWrite(IN_2, HIGH);
      analogWrite(ENA, speedCar);

      digitalWrite(IN_3, HIGH);
      digitalWrite(IN_4, LOW);
      analogWrite(ENB, speedCar);
  }

void goAheadRight(){

      digitalWrite(IN_1, LOW);
      digitalWrite(IN_2, HIGH);
      analogWrite(ENA, speedCar/speed_Coeff);

      digitalWrite(IN_3, LOW);
      digitalWrite(IN_4, HIGH);
      analogWrite(ENB, speedCar);
   }

void goAheadLeft(){

      digitalWrite(IN_1, LOW);
      digitalWrite(IN_2, HIGH);
      analogWrite(ENA, speedCar);

      digitalWrite(IN_3, LOW);
      digitalWrite(IN_4, HIGH);
      analogWrite(ENB, speedCar/speed_Coeff);
  }

void goBackRight(){

      digitalWrite(IN_1, HIGH);
      digitalWrite(IN_2, LOW);
      analogWrite(ENA, speedCar/speed_Coeff);

      digitalWrite(IN_3, HIGH);
      digitalWrite(IN_4, LOW);
      analogWrite(ENB, speedCar);
  }

void goBackLeft(){

      digitalWrite(IN_1, HIGH);
      digitalWrite(IN_2, LOW);
      analogWrite(ENA, speedCar);

      digitalWrite(IN_3, HIGH);
      digitalWrite(IN_4, LOW);
      analogWrite(ENB, speedCar/speed_Coeff);
  }

void stopRobot(){

      digitalWrite(IN_1, LOW);
      digitalWrite(IN_2, LOW);
      analogWrite(ENA, speedCar);

      digitalWrite(IN_3, LOW);
      digitalWrite(IN_4, LOW);
      analogWrite(ENB, speedCar);
 }

void loop() {
    server.handleClient();

      command = server.arg("State");
      if (command == "F") goAhead();
      else if (command == "B") goBack();       //Các dòng này các bạn có thể điều chỉnh để phù hợp với app điều khiển của mình
      else if (command == "L") goLeft();
      else if (command == "R") goRight();
      else if (command == "I") goAheadRight();
      else if (command == "G") goAheadLeft();
      else if (command == "J") goBackRight();
      else if (command == "H") goBackLeft();
      else if (command == "0") speedCar = 400;
      else if (command == "1") speedCar = 470;
      else if (command == "2") speedCar = 540;
      else if (command == "3") speedCar = 610;
      else if (command == "4") speedCar = 680;
      else if (command == "5") speedCar = 750;
      else if (command == "6") speedCar = 820;
      else if (command == "7") speedCar = 890;
      else if (command == "8") speedCar = 960;
      else if (command == "9") speedCar = 1023;
      else if (command == "S") stopRobot();
}

void HTTP_handleRoot(void) {

if( server.hasArg("State") ){
       Serial.println(server.arg("State"));
  }
  server.send ( 200, "text/html", "" );
  delay(1);
}
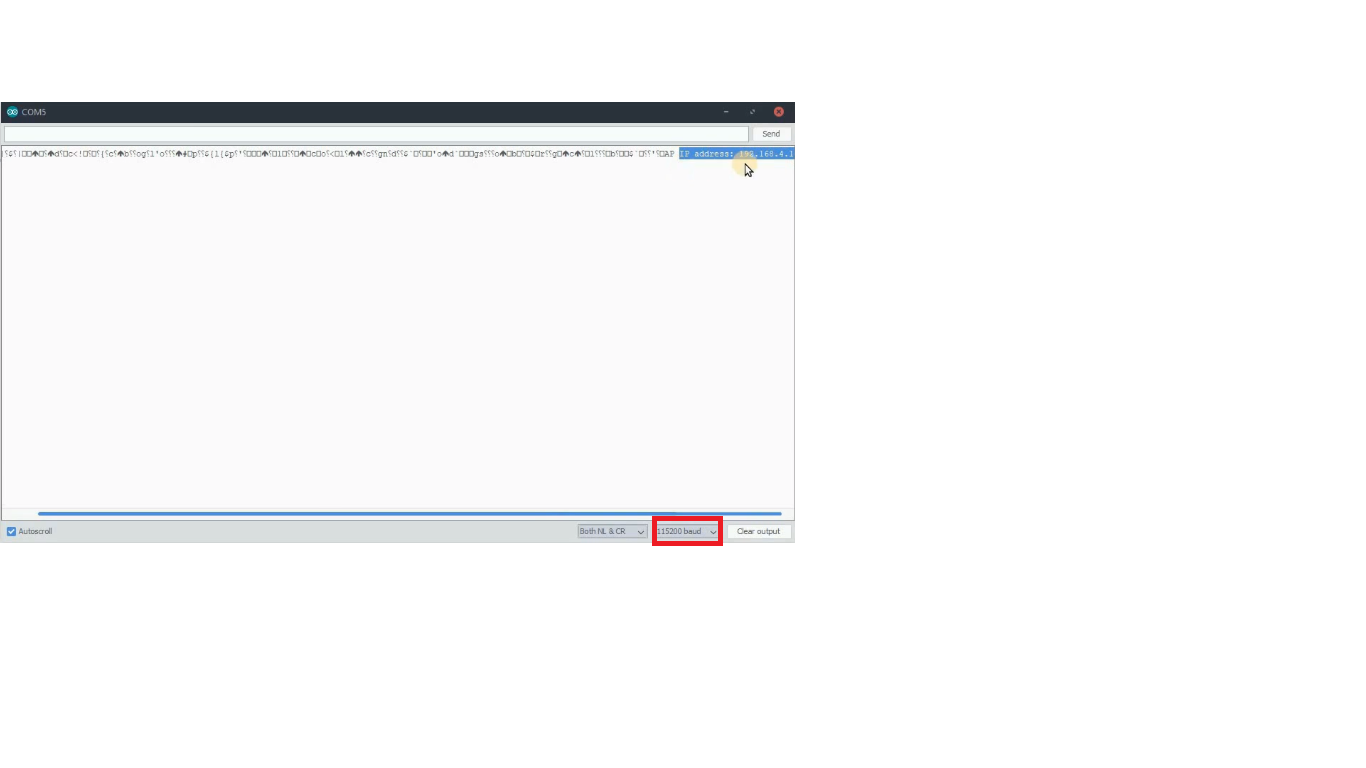
Sau khi nạp code xong chúng ta mở Serial Monitor để xem địa chỉ IP nhé (Lưu ý sau khi mở Serial Monitor các bạn nhớ ấn nút reset trên esp mới có thể xem được địa chỉ IP)
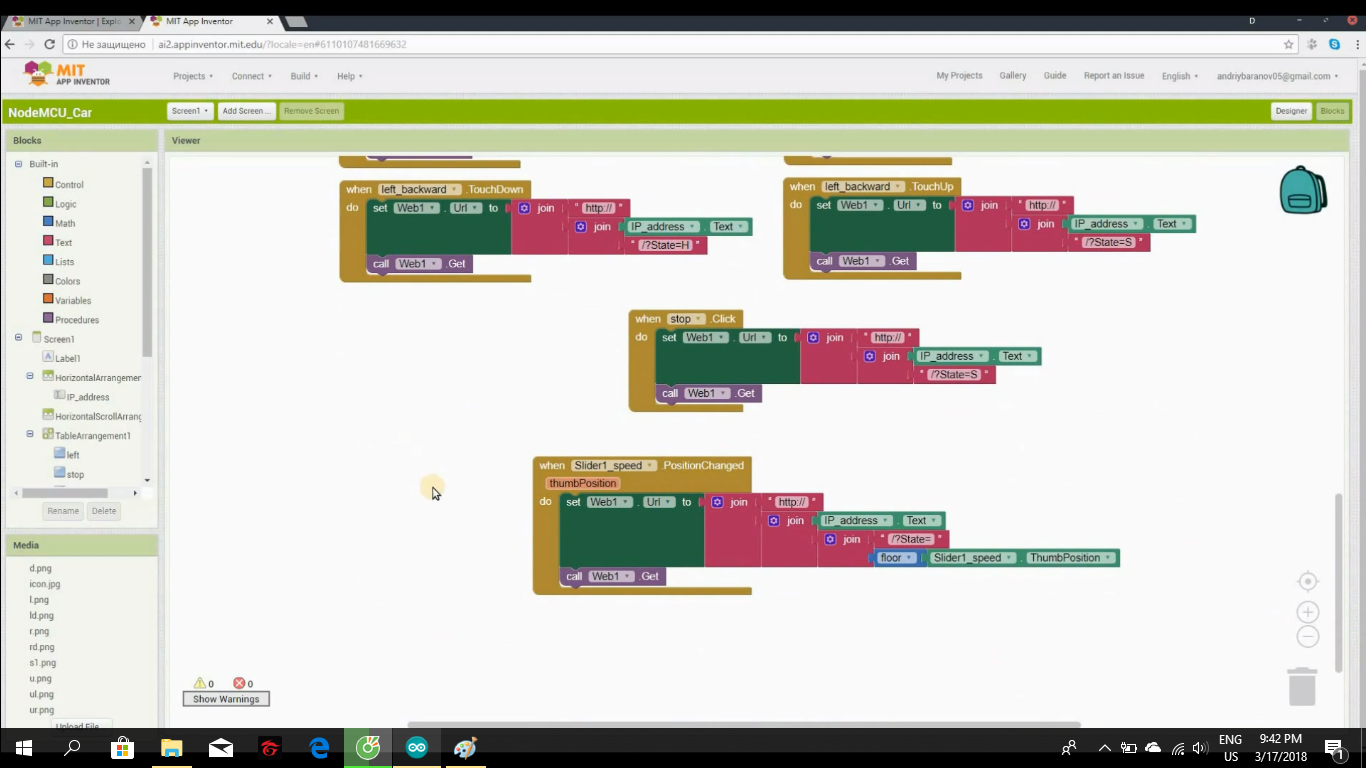
Lập trình app Inventor để điều khiển esp nào
Trước khi bắt đầu thì các bạn đọc lại bài viết này để hiểu cơ bản về app Inventor nhé
Đọc xong rồi chúng ta tiếp tục nhé
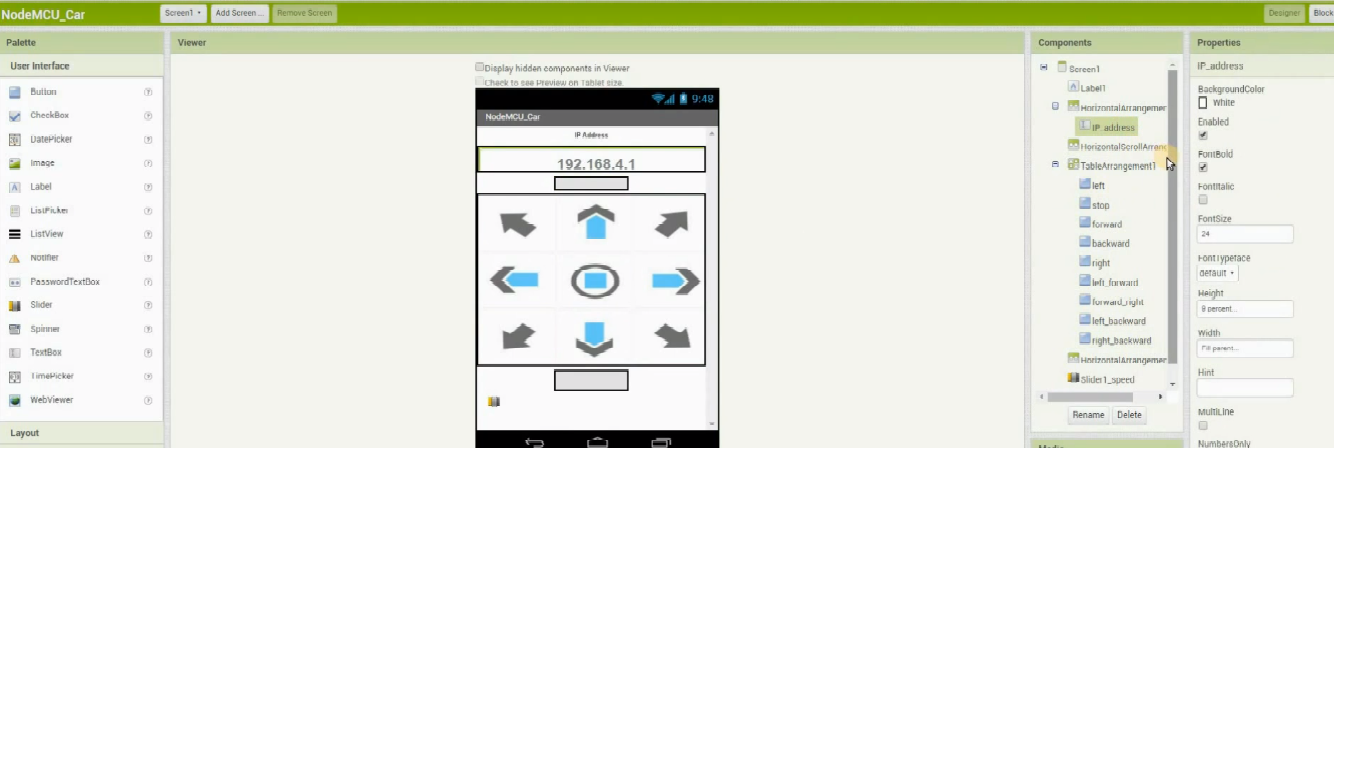
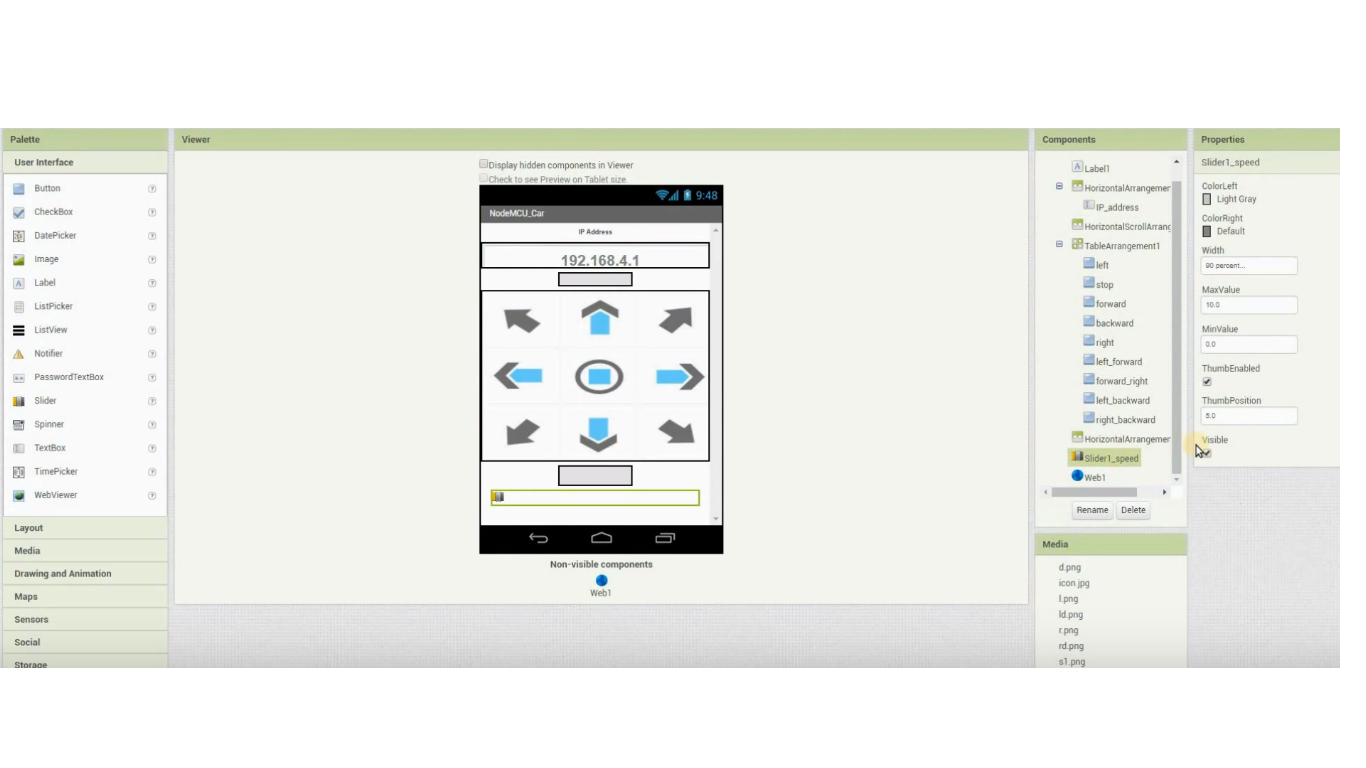
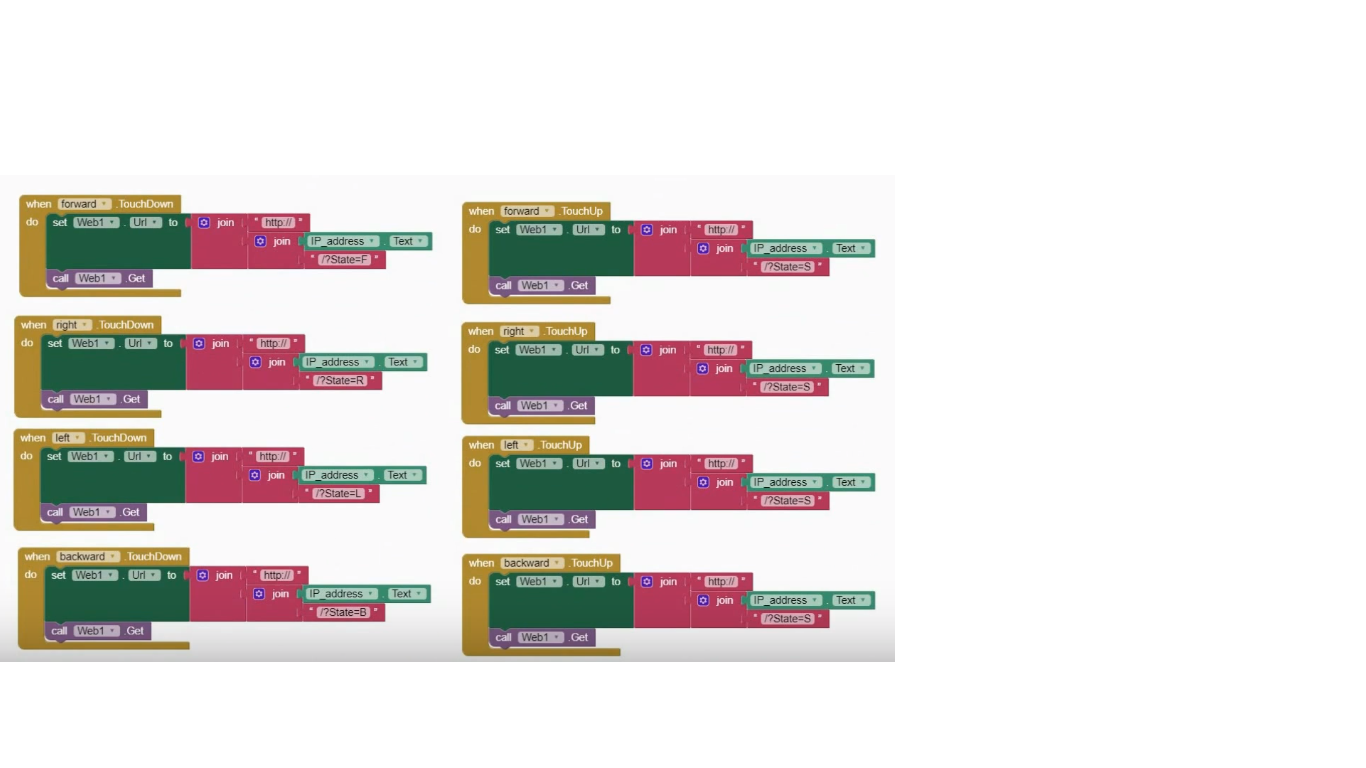
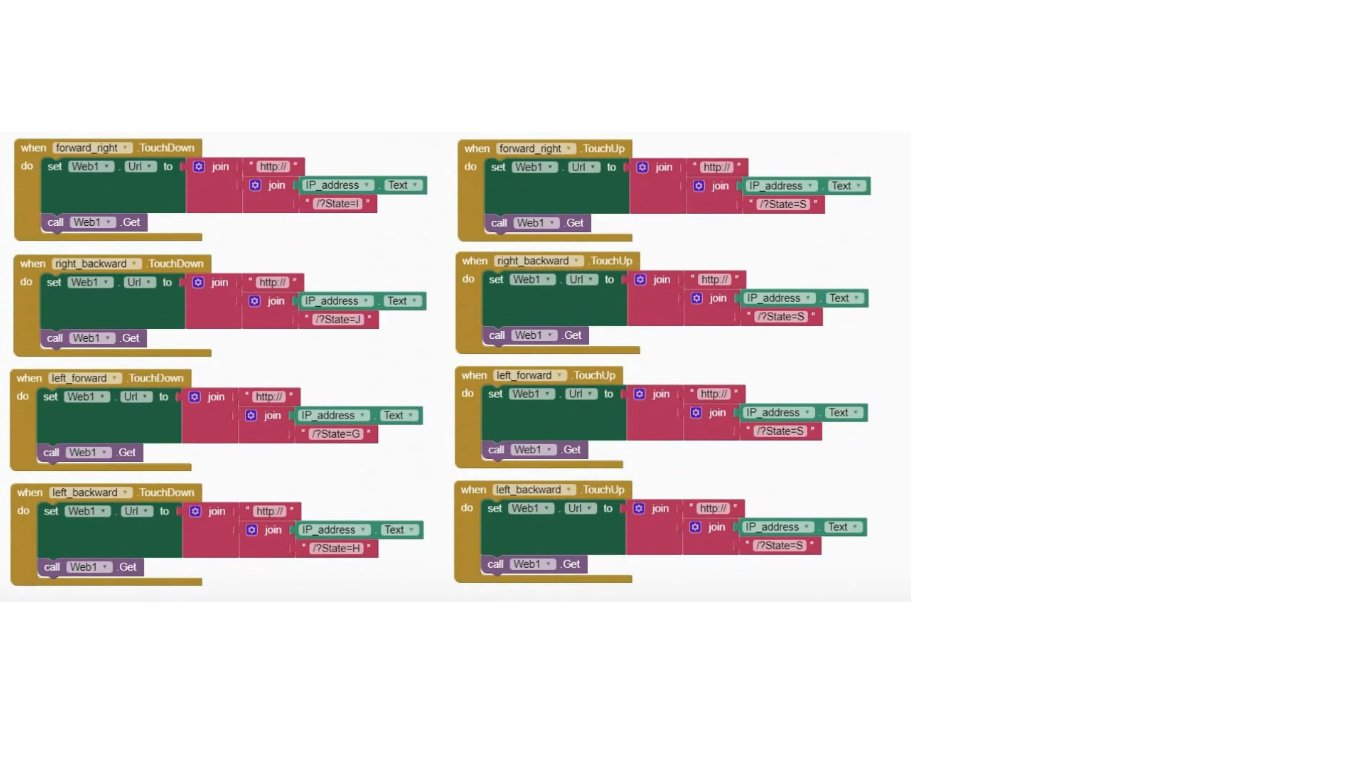
Sau khi khời tạo app Inventor chúng ta thực hiện giống như trong ảnh là đã có 1 phần mềm điều khiển tuyệt vời cho esp rồi 


Kết luận
Chắc các bạn cũng thắc mắc bài viết này hướng dẫn điều khiển động cơ bằng esp8266 thì sao lại ko có mục nào nói đến động cơ nhỉ? Mình không viết bởi vì sơ đồ nối động cơ với mạch cầu H trong Cộng đồng Arduino đã có quá nhiều rồi nên mình không muốn viết hehe, bạn nào không biết thì chỉ cần seach mạch cầu H là ra cả tá tài liệu thôi hehe 


