leeshin456 gửi vào
- 25737 lượt xem
Sài Gòn đang vào mùa mưa rồi anh em ạ, mỗi khi mưa xuống lại một nỗi buồn man mác vì quên không cất quần áo :(
Vậy nên hôm nay mình xin hướng dẫn làm một bộ báo mưa bằng qua FB Messenger cực đơn giản, chỉ cắm là chạy!
Chuẩn bị
- Đọc qua bài viết này để biết nguyên lý hoạt động cũng như lấy key để nhắn tin bằng FB Messenger: http://arduino.vn/tutorial/6561-module-sim-da-loi-thoi-nhan-thong-bao-bang-fb-messenger-zalo
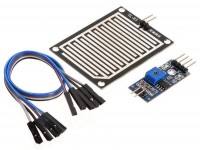
- Module báo mưa (Loại của mình chân digital có mưa là 0 không mưa là 1)
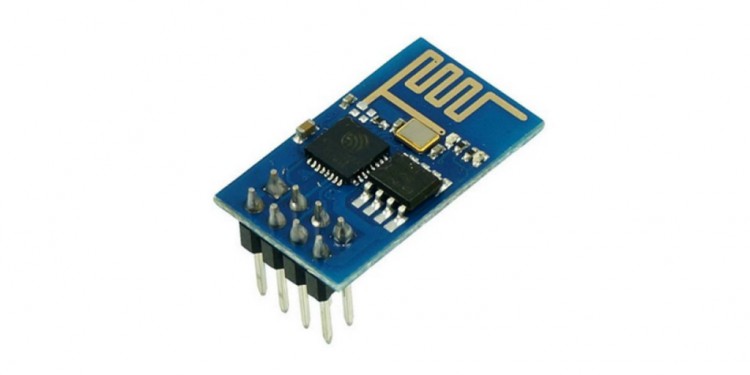
- ESP8266 ở đây mình dùng module nodeMCU
Nào cùng làm
Nối dây:
Nối dây D0 từ cảm biến mưa vào chân D2 (GPIO 4) trên NodeMCU
Cấp nguồn cho cảm biến mưa vào 2 chân GND và VCC
Cắm cáp USB vào NodeMCU
Nạp code:
Các bạn nạp code bên dưới với phần key là key get được như hướng dẫn ở bài:
http://arduino.vn/tutorial/6561-module-sim-da-loi-thoi-nhan-thong-bao-bang-fb-messenger-zalo
Message là nội dung tin nhắn sẽ được gửi đi khi có mưa được mã hóa dạng URL Encode,
các bạn vào https://hs2t.com/itemized/url-encode-decode/ để chuyển đổi từ Tiếng Việt qua URL Encode
WiFiMulti.addAP("KemShop-55LTT", ""); các bạn thay thế bằng tên wifi và password nhà mình để ESP8266 kết nối đến
Còn đây là code:
#include <Arduino.h>

#include <ESP8266WiFi.h>
#include <ESP8266WiFiMulti.h>
#include <ESP8266HTTPClient.h>
#include <WiFiClientSecureBearSSL.h>

ESP8266WiFiMulti WiFiMulti;

// constants won't change. They're used here to set pin numbers:
const int rainPin = 4;     // the number of the pushbutton pin
const int ledPin =  2;      // the number of the LED pin

// variables will change:
int rainState = 0;         // variable for reading the pushbutton status
int lastState = 0;
String key = "g183ftk4h";
String message = "M%C6%B0a%20r%E1%BB%93i%20anh%20%C6%A1i%2C%20mau%20c%E1%BA%A5t%20qu%E1%BA%A7n%20%C3%A1o%20%C4%91i%20k%E1%BA%BBo%20v%E1%BB%A3%20m%E1%BA%AFng";

void setup()
{

  Serial.begin(115200);
  // Serial.setDebugOutput(true);

  Serial.println();
  Serial.println();
  Serial.println();

  // initialize the LED pin as an output:
  pinMode(ledPin, OUTPUT);
  // initialize the pushbutton pin as an input:
  pinMode(rainPin, INPUT);

  for (uint8_t t = 4; t > 0; t--)
  {
    Serial.printf("[SETUP] WAIT %d...\n", t);
    Serial.flush();
    delay(1000);
  }

  WiFi.mode(WIFI_STA);
  WiFiMulti.addAP("KemShop-55LTT", "");
}


void loop()
{
  // read the state of the pushbutton value:
  rainState = digitalRead(rainPin);

  // check if the pushbutton is pressed. If it is, the buttonState is HIGH:
  if (rainState == 0 && lastState == 0) {
    Serial.printf("RAIN\n");
    lastState = 1;
    // turn LED on:
    digitalWrite(ledPin, HIGH);
    // wait for WiFi connection
    if ((WiFiMulti.run() == WL_CONNECTED))
    {

      std::unique_ptr<BearSSL::WiFiClientSecure> client(new BearSSL::WiFiClientSecure);

      //    client->setFingerprint(fingerprint);
      client->setInsecure();

      HTTPClient https;

      Serial.print("[HTTPS] begin...\n");
      if (https.begin(*client, "https://taymay.herokuapp.com/send/?key="+key+"&message="+message))
      { // HTTPS

        Serial.print("[HTTPS] GET...\n");
        // start connection and send HTTP header
        int httpCode = https.GET();

        // httpCode will be negative on error
        if (httpCode > 0)
        {
          // HTTP header has been send and Server response header has been handled
          Serial.printf("[HTTPS] GET... code: %d\n", httpCode);

          // file found at server
          if (httpCode == HTTP_CODE_OK || httpCode == HTTP_CODE_MOVED_PERMANENTLY)
          {
            String payload = https.getString();
            Serial.println(payload);
          }
        }
        else
        {
          Serial.printf("[HTTPS] GET... failed, error: %s\n", https.errorToString(httpCode).c_str());
        }

        https.end();
      }
      else
      {
        Serial.printf("[HTTPS] Unable to connect\n");
      }
    }
  } else if (rainState == 1 && lastState == 1) {
    lastState = 0;
    // turn LED off:
    digitalWrite(ledPin, LOW);
  }

  delay(5000);
}
Thành quả
Vậy thôi khá đơn giản giờ thì cứ thoải mái lướt Facebook không sợ mưa rơi :)
Các bạn có thể xem thêm chi tiết ở video bên dưới nhé