Đỗ Hữu Toàn gửi vào
- 51655 lượt xem
I. Giới thiệu
Bài viết trước mình đã giới thiệu với các bạn về Joystick, đó chính là phím di chuyển trên tay PlayStation. Nhưng các bạn hãy quan sát trong các kỳ thi robocon, hầu hết các thí sinh đều dùng tay PlayStation để điều khiển robot. Vậy làm sao để sử dụng tay PlayStation ??
II. Cách kết nối
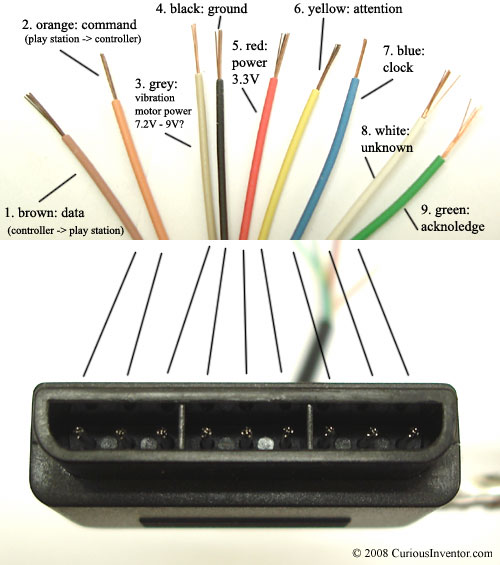
Đối với điều khiển robot, chỉ cần dùng các dây sau: Clock, Data, Command, VCC & GND, Attention. Clock,Data,Command,Attention nối với các chân I/O bất kỳ. Chân Data nên được kéo nguồn bằng điện trở từ 1k-10k. Clock: xung, đồng bộ hóa quá trình truyền dữ liệu. Data: dữ liệu từ gamepad về vdk; Command: dữ liệu từ vdk đến gamepad. Attention: Chip select VCC: 3-5V; GND:0V
Ở bài này, mình kết nối như sau:
| PlayStation 2 | Arduino UNO |
| DATA | 13 |
| Command | 11 |
| Attention | 10 |
| Clock | 12 |
| Vcc | 5V |
| GND | GND |
III. Chương trình
Để làm việc với tay PS2, các bạn cần tải thư viện PS2X_lib tại đây
Code ( ở đây điều khiển động cơ thông qua module L298N ) :
#include <PS2X_lib.h>

#define PS2_DAT 13 // data
#define PS2_CMD 11 //command
#define PS2_SEL 10 // attention
#define PS2_CLK 12 //clock

//#define pressures   true
#define pressures false
//#define rumble      true
#define rumble false
PS2X ps2x; // tạo PS2 điều khiển lớp
int error = 0;
byte type = 0;
byte vibrate = 0;
//Biến cho analog
int temp1;
int temp2;
int temp3;
int temp4;
int temp33;
int temp44;
void setup()
{
    //khai báo các chân điều khiển động cơ
    pinMode(3, OUTPUT);
    pinMode(5, OUTPUT);
    pinMode(6, OUTPUT);
    pinMode(9, OUTPUT);
    Serial.begin(57600);

    delay(300);
    error = ps2x.config_gamepad(PS2_CLK, PS2_CMD, PS2_SEL, PS2_DAT, pressures, rumble);
    if (error == 0) {
        Serial.print("Đã tìm thấy bộ điều khiển ");
        Serial.print("pressures = ");
        if (pressures)
            Serial.println("true ");
        else
            Serial.println("false");
        Serial.print("rumble = ");
        if (rumble)
            Serial.println("true)");
        else
            Serial.println("false");
        Serial.println("Hãy thử tất cả các nút;");
        Serial.println("giữ L1 hoặc R1 sẽ in ra các giá trị analog.");
    }
    else if (error == 1)
        Serial.println("Không kết nối đc, thử lại...");

    else if (error == 2)
        Serial.println("Bộ điều khiển tìm thấy nhưng không chấp nhận lệnh");

    else if (error == 3)
        Serial.println("Bộ điều khiển từ chối để vào chế độ Pressures ");

    //  Serial.print(ps2x.Analog(1), HEX);
    type = ps2x.readType();
    switch (type) {
    case 0:
        Serial.print("Tay điều khiển không phù hợp ");
        break;
    case 1:
        Serial.print("Đã tìm thấy DualShock ");
        break;
    case 2:
        Serial.print("Đã tìm thấy GuitarHero ");
        break;
    case 3:
        Serial.print("Không dây của Sony DualShock điều khiển tìm thấy ");
        break;
    }
}

void loop()
{
    //Cho về 0 xét lại
    temp1 = 0;
    temp2 = 0;
    temp3 = 0;
    temp4 = 0;
    if (error == 1)
        return;

    if (type == 2) {
        ps2x.read_gamepad();
    }
    else { //DualShock Controller
        ps2x.read_gamepad(false, vibrate); //read controller and set large motor to spin at 'vibrate' speed

        if (ps2x.Analog(PSS_LY) > 128) {
            temp1 = (ps2x.Analog(PSS_LY) - 128) * 2;
        }
        else if (ps2x.Analog(PSS_LY) < 128) {
            temp2 = abs(ps2x.Analog(PSS_LY) - 128) * 2;
            if (temp2 > 255)
                temp2 = 255;
        }
        else {
            temp2 = 0;
        }
        if (ps2x.Analog(PSS_RX) > 128) {
            temp3 = (ps2x.Analog(PSS_RX) - 128) * 2;
        }
        else if (ps2x.Analog(PSS_RX) < 128) {
            temp4 = abs(ps2x.Analog(PSS_RX) - 128) * 2;
            if (temp2 > 255)
                temp4 = 255;
        }
        else {
            temp4 = 0;
        }
        //    Serial.println (temp1);
        //    Serial.println (temp2);
        //    Serial.println (temp3);
        //    Serial.println (temp4);
    }
    //Quy định
    // + pin 3 - pin 5 1 động cơ bên trái quay tới
    // + pin 6 - pin 9 1 động cơ bên phải quay tới
    if ((temp2 > 0) && temp3 == 0 && temp4 == 0) {
        analogWrite(3, temp2);
        digitalWrite(5, LOW);
        analogWrite(6, temp2);
        digitalWrite(9, LOW);
    }
    else {
        if ((temp1 > 0) && temp3 == 0 && temp4 == 0) {
            digitalWrite(3, LOW);
            analogWrite(5, temp1);
            digitalWrite(6, LOW);
            analogWrite(9, temp1);
        }
        else {
            if ((temp2 > 0) && temp4 > 0) {
                temp44 = (temp2 - temp4);
                if (temp44 < 0) {
                    temp44 = 0;
                }
                analogWrite(3, temp44);
                digitalWrite(5, LOW);
                analogWrite(6, temp2);
                digitalWrite(9, LOW);
            }
            else {
                if ((temp2 > 0) && temp3 > 0) {
                    temp33 = (temp2 - temp3);
                    if (temp33 < 0) {
                        temp33 = 0;
                    }
                    analogWrite(3, temp2);
                    digitalWrite(5, LOW);
                    analogWrite(6, temp33);
                    digitalWrite(9, LOW);
                }
                else {
                    if ((temp1 > 0) && temp4 > 0) {
                        temp44 = (temp1 - temp4);
                        if (temp44 < 0) {
                            temp44 = 0;
                        }
                        analogWrite(3, LOW);
                        digitalWrite(5, temp44);
                        analogWrite(6, LOW);
                        digitalWrite(9, temp1);
                    }
                    else {
                        if ((temp1 > 0) && temp3 > 0) {
                            temp33 = (temp1 - temp3);
                            if (temp33 < 0) {
                                temp33 = 0;
                            }
                            analogWrite(3, LOW);
                            digitalWrite(5, temp33);
                            analogWrite(6, LOW);
                            digitalWrite(9, temp1);
                        }
                        else {
                            digitalWrite(3, LOW);
                            digitalWrite(5, LOW);
                            digitalWrite(6, LOW);
                            digitalWrite(9, LOW);
                        }
                    }
                }
            }
        }
    }
}
IV. Lời kết
Với việc đọc các giá trị temp của tay game....các bạn có thể dùng để điều khiển các thiết bị, robot !!! Chúc các bạn thành công!!