monsieurvechai gửi vào
- 119850 lượt xem
Đây là bài biến thể từ "Đi học thoai" phần 1 (cảnh báo cháy với Raspberry Pi và Arduino) và Lồng tiếng cho Raspberry Pi. Nếu bạn đi học không có thời gian check email liên tục thì hệ thống sẽ phát cảnh báo cháy qua loa.
Nguyên lý
Ta dùng cảm biến nhiệt độ DS18820 đo nhiệt độ và gửi qua cổng USB serial. Raspberry Pi đọc nhiệt độ và nếu trên 60 thì sẽ phát tiếng cảnh báo với chương trình chuyển ngữ festival.
Chuẩn bị
Bạn nối theo như bài đã viết trên cộng đồng nha:http://arduino.vn/bai-viet/977-huong-dan-su-dung-cam-bien-nhiet-do-ds18b...
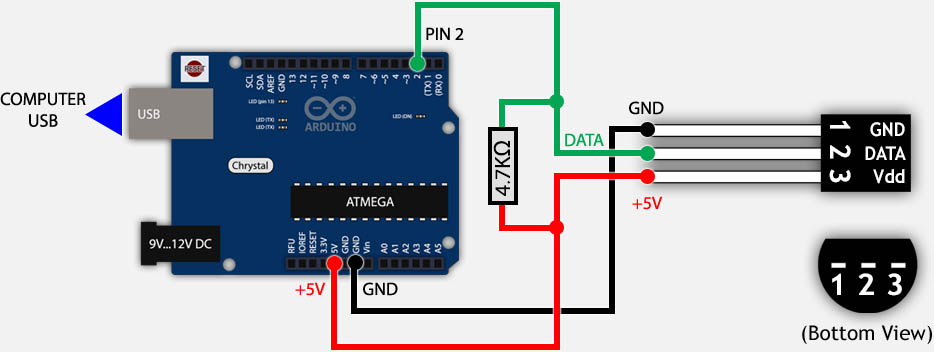
Sau đó nối Arduino với USB của Raspberry Pi là xong.
Code Arduino
#include <OneWire.h>

// OneWire DS18S20, DS18B20, DS1822 Temperature Example
//
// http://www.pjrc.com/teensy/td_libs_OneWire.html
//
// The DallasTemperature library can do all this work for you!
// http://milesburton.com/Dallas_Temperature_Control_Library

OneWire  ds(2);  // on pin 2CM0'CO (a 4.7K resistor is necessary)

void setup(void) {
  Serial.begin(9600);
}

void loop(void) {
  byte i;
  byte present = 0;
  byte type_s;
  byte data[12];
  byte addr[8];
  float celsius;

  if ( !ds.search(addr)) {
    Serial.println("No more addresses.");
    Serial.println();
    ds.reset_search();
    delay(250);
    return;
  }

  Serial.print("ROM =");
  for( i = 0; i < 8; i++) {
    Serial.write(' ');
    Serial.print(addr[i], HEX);
  }

  if (OneWire::crc8(addr, 7) != addr[7]) {
      Serial.println("CRC is not valid!");
      return;
  }
  Serial.println();

  // the first ROM byte indicates which chip
  switch (addr[0]) {
    case 0x10:
      Serial.println("Chip = DS18S20");  // or old DS1820
      type_s = 1;
      break;
    case 0x28:
      Serial.println("Chip = DS18B20");
      type_s = 0;
      break;
    case 0x22:
      Serial.println("Chip = DS1822");
      type_s = 0;
      break;
    default:
      Serial.println("Device is not a DS18x20 family device.");
      return;
  }

  ds.reset();
  ds.select(addr);
  ds.write(0x44, 1);        // start conversion, with parasite power on at the end

  delay(1000);     // maybe 750ms is enough, maybe not
  // we might do a ds.depower() here, but the reset will take care of it.

  present = ds.reset();
  ds.select(addr);
  ds.write(0xBE);         // Read Scratchpad

  Serial.print("Data = ");
  Serial.print(present, HEX);
  Serial.print(" ");
  for ( i = 0; i < 9; i++) {           // we need 9 bytes
    data[i] = ds.read();
    Serial.print(data[i], HEX);
    Serial.print(" ");
  }
  Serial.print("CRC=");
  Serial.print(OneWire::crc8(data, 8), HEX);
  Serial.println();

  // Convert the data to actual temperature
  // because the result is a 16 bit signed integer, it should
  // be stored to an "int16_t" type, which is always 16 bits
  // even when compiled on a 32 bit processor.
  int16_t raw = (data[1] << 8) | data[0];
  if (type_s) {
    raw = raw << 3; // 9 bit resolution default
    if (data[7] == 0x10) {
      // "count remain" gives full 12 bit resolution
      raw = (raw & 0xFFF0) + 12 - data[6];
    }
  } else {
    byte cfg = (data[4] & 0x60);

    // at lower res, the low bits are undefined, so let's zero them
    if (cfg == 0x00) raw = raw & ~7;  // 9 bit resolution, 93.75 ms
    else if (cfg == 0x20) raw = raw & ~3; // 10 bit res, 187.5 ms
    else if (cfg == 0x40) raw = raw & ~1; // 11 bit res, 375 ms

    //// default is 12 bit resolution, 750 ms conversion time
  }
  celsius = (float)raw / 16.0;

  Serial.print("Temperature = ");
  Serial.print(celsius);
  Serial.print(" Celsius, ");
}
Code trên Raspberry pi
Trước hết bạn phải tải chương trình festival về với sudo apt-get install thần thánh:
sudo apt-get install festival
Chép đoạn code sau và lưu lại với tên di_hoc_thoi_4.py.
#!/usr/bin/bash
#By MonsieurVechai
import time
import os, subprocess
import re, serial
'''
serial stuff returned:
    ROM = 22 D 8D 16 0 0 0 C9
    4B 46 7F FF 2 10 71  CRC=71
      Temperature = 22.87 Celsius, 73.18 Fahrenheit
      No more addresses.
'''


class ds18x20:
    def __init__(self):
        try:
            self.ser = serial.Serial('COM1', 9600, timeout=1)
        except:
            print "Cannot open serial port"
            exit(1)
        print "ds18x20 device serial link opened"
        self.ser.flushInput()

    def readTemperature(self):
        isTemp = False
        while isTemp == False:
            line = self.ser.readline()
            if line.startswith("Temperature"):
                isTemp = True
                re_list = re.findall('\d+.\d+',line) # find the decimal numbers in the string and put to list using re (regular expression)
                temperature = float(re_list[0])
        return temperature

def close(self):
        self.ser.close()
        print 'Device closed'

def read_temperature():
    dev = ds18x20()
    #Sometimes IndexError happens and we need to take the temperature measurement again
    try:
     temp = dev.readTemperature()
    except IndexError:
     temp = dev.readTemperature()

    dev.close() #Have to close device after use
    return float(temp)


def main():
    dev = ds18x20()
    print "Arduino is ready."

    try:
        # Loop until users quit with CTRL-C
        while True :
            # Read Temperature from Arduino
            temperature = read_temperature()
            print "Current Temperature: " + str(temperature)
            if temperature > 60:
                print "High temperature detected. Warning!!!"
                os.system('echo "Warning! Warning! Warning! Temperature is too high!"|festival --tts')

    except KeyboardInterrupt:
        print "Quit program"


if __name__ == "__main__":
    main()
Gợi ý nâng cao
- Kết hợp với các cảm biến khác như khí gas, nước.
- Gắn thêm potentiometer để ngưỡng phát cảnh báo.
- Gắn thêm 1 nút bấm để reset hệ thống.