kylin915 gửi vào
- 41312 lượt xem
Mô tả dự án:
Mình thấy nhiều bài đăng về sử dụng esp điều khiển bật tắt led, điều khiển robot car, cũng muốn góp vui chút  . Chúc các bạn thành công, đây là dự án và code của mình.
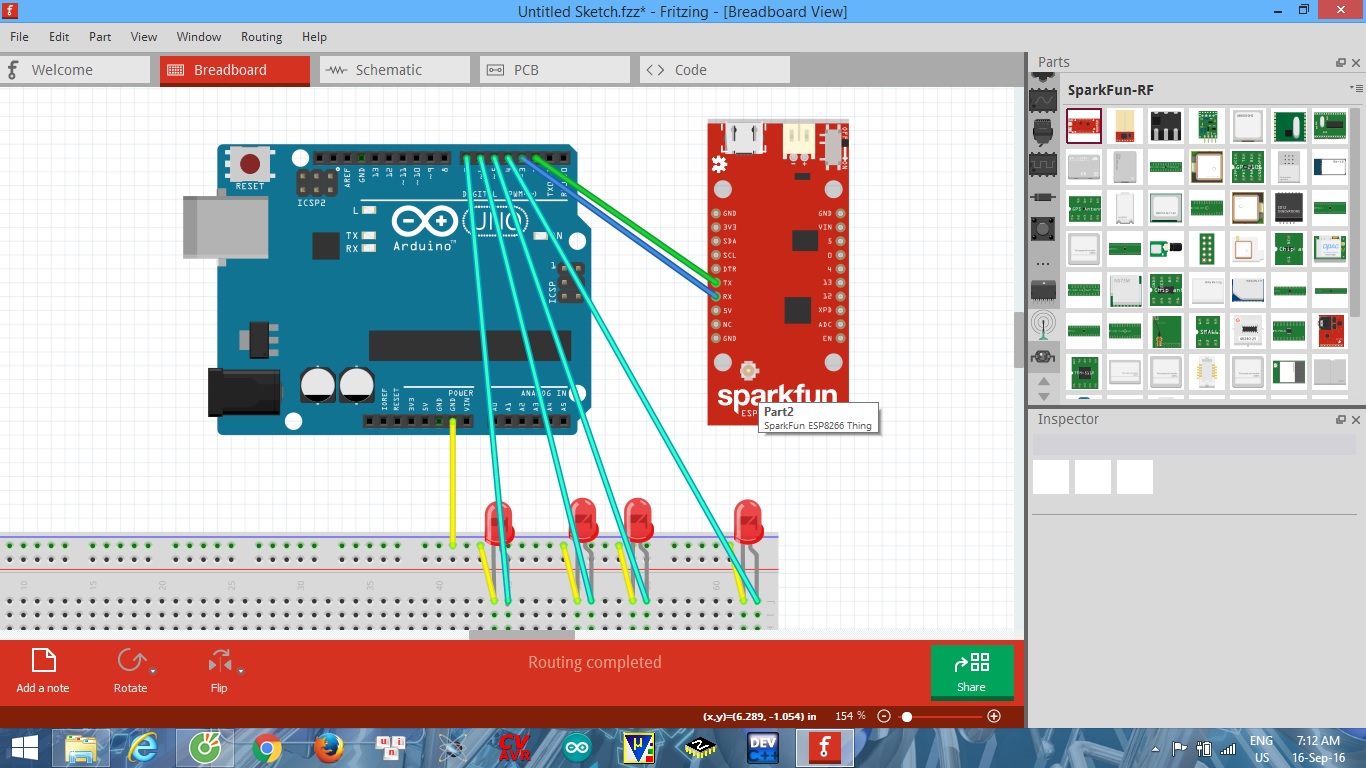
Linh kiện gồm có
- Arduino uno r3
- Module esp8266
- Khung xe robot 3 bánh (2 động cơ + 1 bánh đa hướng)
- Bạn muốn sáng tạo thêm? Tìm hiểu thêm
- Nguồn nuôi (pin)
- Dây cắm breadboard
- Breadboard
Nối mạch
tạo 1 app android điều khiển
Các bạn vào appinventor.mit.edu để tạo tài khoản vào creat 1 project nhỏ nhé !
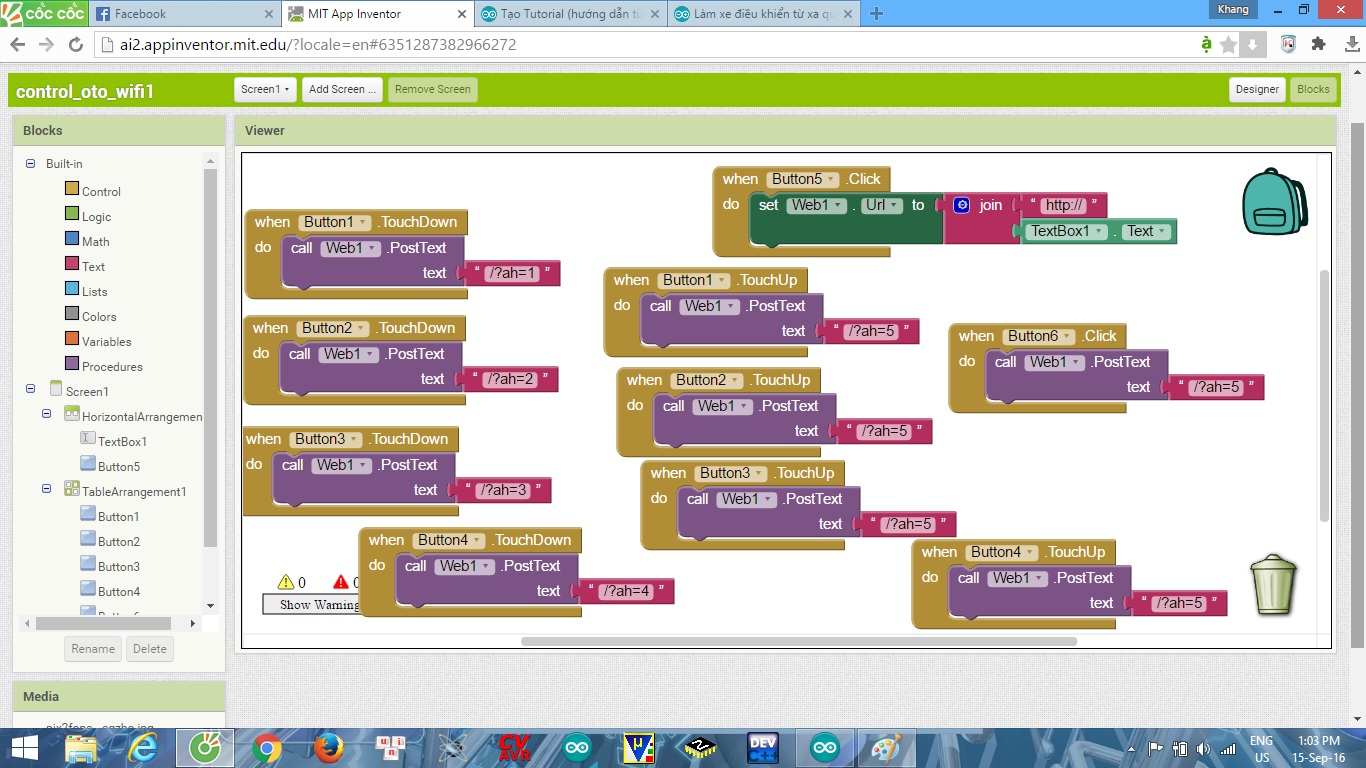
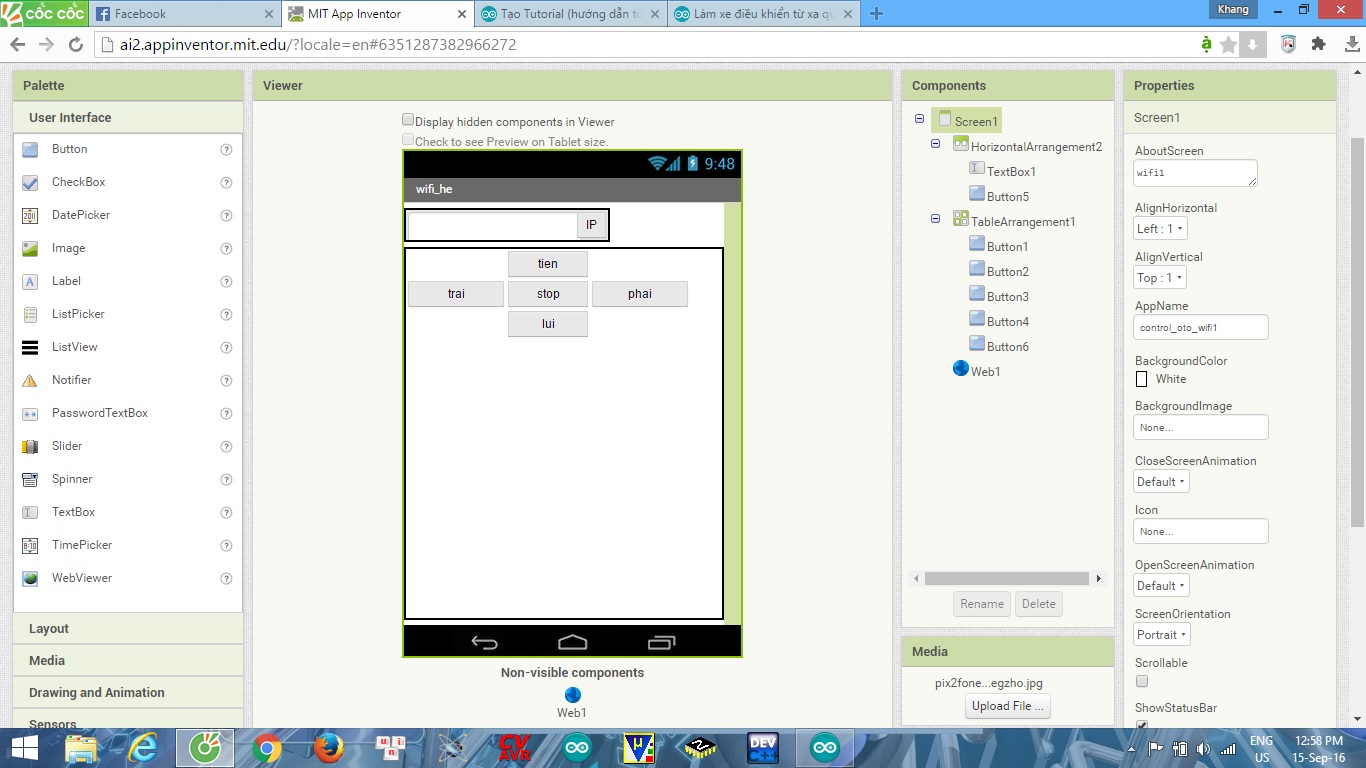
Lập trình
#include <SoftwareSerial.h>
#include <avr/interrupt.h>
#define DEBUG true

SoftwareSerial esp8266(2, 3); // make RX Arduino line is pin 2, make TX Arduino line is pin 3.
// This means that you need to connect the TX line from the esp to the Arduino's pin 2
// and the RX line from the esp to the Arduino's pin 3
void setup()
{
	Serial.begin(57600);
	esp8266.begin(57600); // your esp's baud rate might be different
	pinMode(4, OUTPUT);
	pinMode(5, OUTPUT);
	pinMode(6, OUTPUT);
	pinMode(7, OUTPUT);
	digitalWrite(4, LOW);
	digitalWrite(5, LOW);
	digitalWrite(6, LOW);
	digitalWrite(7, LOW);
	sendData("AT+RST\r\n", 2000, DEBUG); // reset module
	sendData("AT+CWMODE=2\r\n", 1000, DEBUG); // configure as station 1// AP 2// both 3 // here set AP
// sendData("AT+CWJAP=\"Thanh\",\"hoilamchi\"\r\n",5000,DEBUG);
// sendData("AT+CIPSTA=\"192.168.0.201\"\r\n",3000,DEBUG);
	sendData("AT+CWSAP=\"no_net\",\"anhyeuem\",5,2\r\n", 3000, DEBUG); // set ssid ang pass for AP
	sendData("AT+CIPAP=\"192.168.5.10\"\r\n", 1000, DEBUG); // get ip address// input add to app androir
	sendData("AT+CIFSR\r\n", 2000, DEBUG); // get ip address
	sendData("AT+CIPMUX=1\r\n", 1500, DEBUG); // configure for multiple connections
	sendData("AT+CIPSERVER=1,80\r\n", 1000, DEBUG); // turn on server on port 80
	delay(100);

}

void loop()
{


	if(esp8266.available()) // check if the esp is sending a message
	{

		if(esp8266.find("+IPD,"))
		{
			delay(10);
			int connectionId = esp8266.read() - 48;
			// turn the LED off by making the voltage LO

			if(esp8266.find("ah="))
			{
				delay(10);
				char giatri = (esp8266.read());

				if(giatri == '1')
				{
					digitalWrite(4, HIGH);
					digitalWrite(5, LOW);
					digitalWrite(6, HIGH);
					digitalWrite(7, LOW);
				}  // turn the LED on (HIGH is the voltage level

				if(giatri == '2')
				{
					digitalWrite(4, HIGH);
					digitalWrite(5, LOW);
					digitalWrite(6, LOW);
					digitalWrite(7, LOW);
				}

				if(giatri == '3')
				{
					digitalWrite(4, LOW);
					digitalWrite(5, LOW);
					digitalWrite(6, HIGH);
					digitalWrite(7, LOW);
				}

				if(giatri == '4')
				{
					digitalWrite(4, LOW);
					digitalWrite(5, HIGH);
					digitalWrite(6, LOW);
					digitalWrite(7, HIGH);
				}

				if(giatri == '5')
				{
					digitalWrite(4, LOW);
					digitalWrite(5, LOW);
					digitalWrite(6, LOW);
					digitalWrite(7, LOW);
				}
			}

			String closeCommand = "AT+CIPCLOSE=";
			closeCommand += connectionId; // append connection id
			closeCommand += "\r\n";
			sendData(closeCommand, 50, DEBUG);

		}
	}
}


String sendData(String command, const int timeout, boolean debug)
{
	String response = "";

	esp8266.print(command); // send the read character to the esp8266

	long int time = millis();

	while( (time + timeout) > millis())
	{
		while(esp8266.available())
		{

			// The esp has data so display its output to the serial window
			char c = esp8266.read(); // read the next character.
			response += c;
		}
	}

	if(debug)
	{
		Serial.print(response);
	}

	return response;
}
ksp có reup code lên codebender để các bạn dễ biên dịch
Chuyên mục: